Your cart is currently empty.
Get the Look with Metal Effects, O’verlays and Ikea Besta Inviken Console
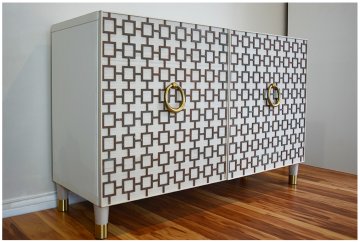
By adding O’verlays painted in a metal effect of copper patina, attaching large door pulls and dressed up legs, you can transform an Ikea Besta console
into a beautiful piece of furniture worthy of displaying in the front hall, an entertainment center in your living room or an amazingly stylish sideboard in your dining room. You can have it all, a high-end look and stay within budget with our IKEA hacks.
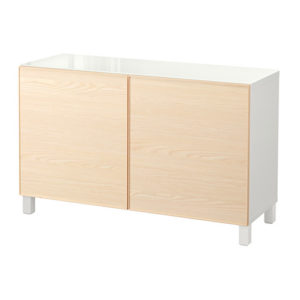
For the doors, we decided to go with the latest addition to the Ikea Besta door designs – the INVIKEN door. The small trim around the Inviken (see inset below) provides a nice space for the O’verlay to fit snugly, creating the perfect finished edge.

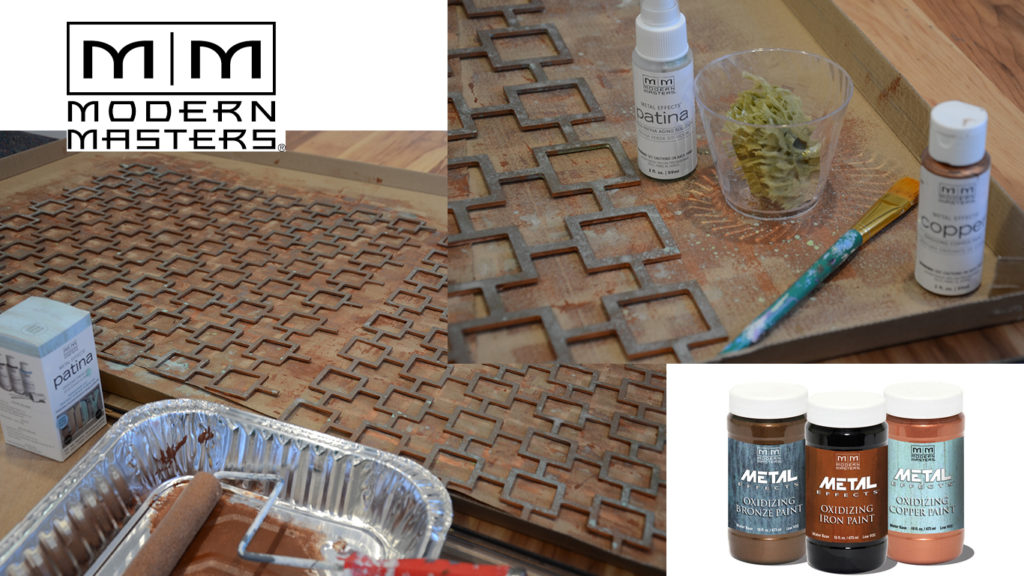
For the copper patina finish, we used Modern Masters Metal Effects paint,
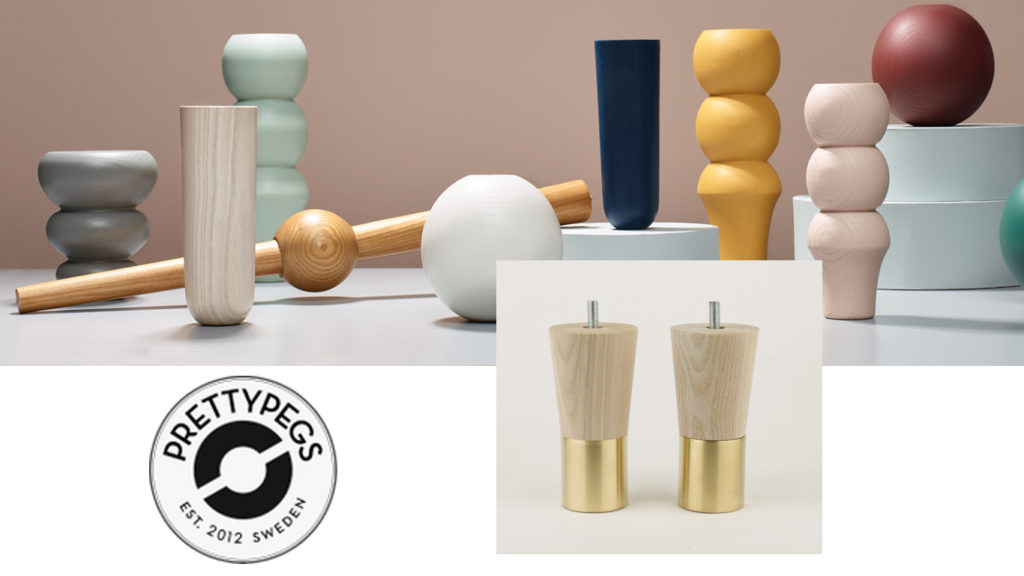
Pretty Pegs for stylish legs offering a variety to choose from,
And the Harper Mini O’verlays Kit for Ikea Besta “Inviken” 2 door unit.
Here’s a list of what you’ll need:
– (1) Besta 2 door console unit with Inviken doors -can be bought in parts or as a complete assembly.
– (4) Pretty Pegs Estelle 120 in Ash or other legs suitable to hold the console
– Modern Masters “Metal Effects” Green Patina Copper Finish or choose a different Metal Effects patina finish
– Harper Mini O’verlays Kit for Ikea Besta “Inviken” 2 door unit- 24-5/8″ x 23″ x 1/8″ thick
– (2) Large door pulls or door knockers – we used Baldwin door knockers
– Drill
– Paint Tray
– Small paint roller
– Small paint brush
– Scotch Spray Adhesive or other adhesives of your choice
Steps:
1. ASSEMBLE the console and doors then attach the legs following the manufacturer’s directions.
2. PREP O’verlays – Lightly sand if needed with an emery board or fine sandpaper and thoroughly clean off dust.
3. PAINT O’verlays – Read the Modern Masters Metal Effects Patina instructions before beginning the painting process. Timing is important in order to get the desired finish. We recommend that you test the process on a small sample so you can see how you want the finish to look. Let the paint dry thoroughly.
4. GLUE O’verlays- A spray adhesive is the better choice for this O’verlays panel because of the detailed pattern. Spray the panels generously being sure to apply an even coat. Place the panels on the door with the shorter stems at the top. Press down. We used a small clean paint roller to press the panels firmly into place.

5. ATTACH Door pulls – Determine where you want to place the pulls. Mark, drill and attach.

6. ADMIRE your work.
The longest part of the project and definitely worth the effort, was the painting process and allowing it to dry. The rest took an afternoon to complete. It really was an easy DIY!
Contact us with any questions and please be sure to send us pictures of your before and after of your project.
 The O’verlays Team
![]()