Your cart is currently empty.
A Sticky Subject
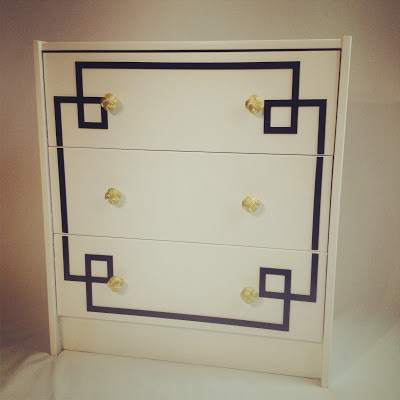

(above Pippa Rast Kit #1)
Today we are talking about glue, so boring but so necessary when it comes to O’verlays. Think of O’verlays like the false eyelashes for your dresser. They add serious glam and you don’t want them falling off, right? So we are going to run down a list of options and go through what sticks to what. Ready? Good.

(above Dee Dees on Malm)
Lets cover the basics- applying glue.
-You will want to make sure that the surface you are applying to is free of dirt and grease, as well as the backside of the O’verlay. Basic rubbing alcohol found in your medicine cabinet does a great job. Be sure to use a lint free rag (I once made the mistake of using a cotton ball and had tiny pieces of it stuck to any rough edge I wiped against!)

-When applying the glue, the more contact points the better. For best adhesion we recommend running a thin beading of glue (think VERY skinny line) over the entire perimeter edge of the O’verlay and if you have a pattered center apply in several areas there too.

(above Bubble Pattern on Malm)
– Gravity is not your friend here. If you can lay the surface that is getting the O’verlay flat on its back please do so (pull those drawers out and set them face up). If that isn’t an option you will want to have some delicate painters tape on hand to hold the panels in place.

(above 2″ Lolita Strips)
-Carefully place you O’verlay onto the surface and press it in place. Wipe away any glue that seeps under the edges with a damp Q-tip or rag. Tape the corners to hold if needed, and let the panel dry to the time suggested on the glue instructions.

Now you’re wondering “What glue do I use?”
This is going to depend on a few factors:
1) light or heavy usage
Light usage= drawer/cabinet fronts that don’t see much action, decorative applications that are seen but rarely touched
Heavy Usage=areas that have frequent handling or bumping into, think stair risers, heavy use cabinets and drawers
(if you have kids think heavy usage always, even if its just going under a crown molding- they will figure a way to knock it down, I swear!)
2) what you are gluing to (wood, painted surface, laminate, etc)
I am going to run through a few brands and will list pro-cons.
Lets start with my favorite product, Liquid Nails.
This brand has two products that are my go-to glues and they are available at Home Depot and most hardware stores.
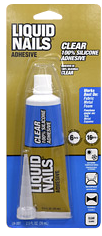
1) Liquid Nails Clear Silicone Adhesive (blue)
- great for light decorative use and use with our 1/8″ thick products
- semi-permanent, the glue dries similar to a clear rubbery caulk, and in some instances can be peeled off
- it dries clear, so any seepage is much less noticeable
- dries quickly
- works best for wood, metal, concrete, fiberglass, painted surfaces, vinyl, porcelain, house numbers, countertops, plastics,* moldings and canvas/fabrics.
* Will not bond polyethylene or polypropylene. - great for use on many IKEA products
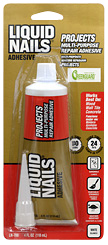
2) Liquid Nails Projects Multi-Purpose Adhesive (red )
- works for light and heavy use and best for 1/4″+ thick products
- off white in color
- paintable, stainable, sand able
- permanent
- works best for wall tile, soap dishes, towel racks, house numbers, wood, corkboard, vinyl cove base, drywall patches, aluminum, concrete, stone, carpeting, brick veneer, ceramics, shelving, countertops, metal and moldings.
- great for most IKEA applications
Next candidate is Loctite, available at Home Depot.


3) Loctite Stik n Seal
- best for light to moderate use, 1/8″ thick products
- dries clear in 45 minutes
- best for bonding brick, cement, ceramic, glass, leather, rubber, wood, tile, fabric and most plastics
4) Loctite 5 Minute Epoxy
- best for heavy use and for thicker O’verlays (we recommend this product for our Greek Key Corner Brackets)
- dries in one hour
- dries translucent yellow so make sure to clean up any seepage
- Best for bonding metal, glass, ceramic, wood, many rigid plastics, china, tile, fiberglass, concrete and stone
- permanent

(above Greek Key Corner Brackets on Lack Table)

(above 1/2″ thick Greek Key Double on Malm)
And finally we have Gorilla Glue. While we have had many people use the basic Gorilla Glue that dries a brownish yellow with success, we find it very messy and hard to control.
We prefer their super glue.

5) Gorilla Super Glue
- light to moderately heavy use
- dries in one minute
- dries clear
- bonds metal, wood, paper, ceramics, leather, most plastics
- great go to for most IKEA products

(above Ruby on Tarva)
Happy Gluing!