Your cart is currently empty.
How To: “Metallic O’verlays”- EASY
We are always being asked about painting techniques and ways to make O’verlays look unique, so we decided to start a new series featuring tons of different painting techniques.
These will range in difficulty and finished from woodgraining to gilding, and we will be sure to rank them for you (easy, intermediate and advanced),
but please don’t shy away from those labeled advanced.
We are going to make the instructions so that anyone can attempted them,
and all you might need is a bit more patience.
Also, if there is a look you’d like to see be sure to comment and let us know.
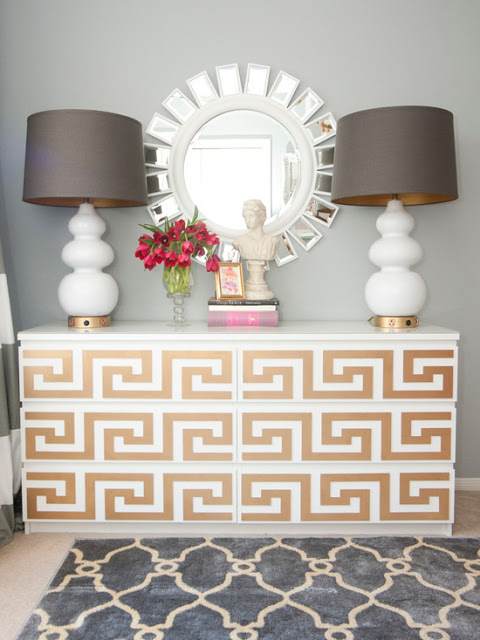
To start, we decided to go the easy route for the first with basic metallic finishes.
Metallics are still huge, and gold and brass are hot right now.


via Design Manifest
We found so many great One-Step finishes available.
The only skill you will need to know is how to spray paint!
To get started you will need:
-a drop cloth or large piece of cardboard
-well ventilated area (outdoors is best)
-choice of spray paint

Our product is made from a plastic derivative, so while many paints will adhere just fine, those paints that are made for use on plastic are even better. They actually bond to the O’verlay and are almost impossible to scratch off. If you want best adhesion we recommend using on of those, or priming the surface first with a plastic primer.

PLEASE BE SURE TO READ THE DIRECTIONS ON THE CAN FOR DRY TIMES AND TIMES BETWEEN COATS!
This is very important because every manufacturer has different times, and it can lead to crackling or irregularities in finishes if not followed. OK, now that we got that out of the way lets paint…

To spray, hold can about 12″ from the surface and spray a light coat moving back and forth.
Turn the cardboard at 90 degree angles to be sure you get all sides too.
Once dried for the proper time you can apply the finish color.

Apply the finish coat the same way, being sure to get all edges.
If you really want a tough finish that will hold up to excessive abuse (i.e: if they are going on stair risers) we recommend a clear top coat of polyurethane.

This can be sprayed as well, and 2 coats is recommended.
There are so many great metallics, we just had to test a bunch!
Here is a montage of some of our favorites:
First off, we LOVE Rustoleum’s Bright Gold!

Covers great and is nice and warm.
ta da!

…and there are tons more colors…
Silver

Copper

Satin Nickel Finish

Above Close Up

Hammered Silver
(we actually are really impressed by how easy this was to achieve a complex look)

some close ups…


Another Hammered Metal , but this was made for plastics, so no primer needed:


Champagne Mist
(when you want something in between gold and silver)

So get spraying!
We would love to see your creations, so please email us at danika@myoverlays.com if you have something you’d like to share.
Join us next week for a “how to” on making your O’verlays look like wood.